Automate Your Professional Services Sales Workflow With PipeDrive, Ignition & Zapier

We zap at Blueprint Accounting
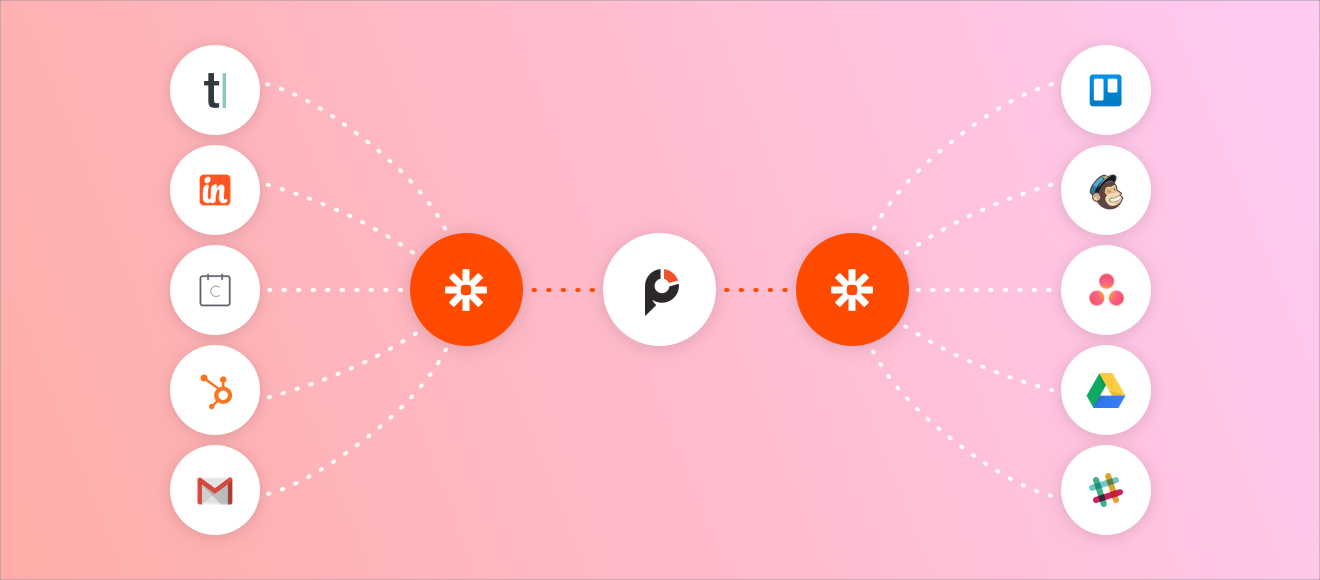
At Blueprint Accounting, we use Zapier extensively. We have several different apps integrated with Zapier, including: Ignition (of course), Pipedrive, Asana, Slack, Microsoft 365, and many others.
A lot of the zaps we are using revolve around removing recurring operational tasks from our day-to-day so that we can focus on client delivery. One of our zaps related to client onboarding has been featured in a webinar with Ignition and other posts by our industry peers (here’s one from Trent McLaren of Ignition).
As the saying goes, a rising tide lifts all boats. We've saved hours in our sales process by integrating Ignition with Pipedrive (via Zapier). We've also got a consistent and powerful process that our clients love. To make your lives easier, I've broken down both our Pre-sale and Post-sale workflows we use at Blueprint Accounting.
Our Sales Workflow in Action
Before we dive into the details of how we've automated our sales workflow in PipeDrive and Ignition, I wanted to show you it in action. I recommend you watch this video first, and then down below, I'll show you exactly how to set it up in Zapier.
Introduction to Pipedrive
If you aren’t using a CRM, you’re failing at tracking your deals. It’s ultra important to know what’s in your pipeline of deals so you know where to focus your effort, who you’ve been in contact with, and what steps to take next to move a deal along your sales pipeline.
At Blueprint Accounting, we recently made the switch to Pipedrive. If you haven’t heard of Pipedrive, it’s quite an efficient tool, especially if you prefer a visual for your sales pipeline.
Pipedrive has some pretty amazing features that really stood out for us when evaluating CRMs.
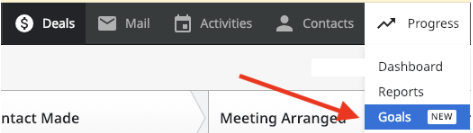
1. Create goals for specific periods
Click on Progress > Goals. Once inside the Goals section of Pipedrive you can click on Add Goals (the big green button on the top-right). This will allow you to create a goal based on specific details. The details you need to decide on can vary greatly but have several categories (see first two screenshots below).
The final picture is a well-defined goal for you to track against. Each time you complete something related to the goal, you move closer to attaining that goal.

2. Link your email into Pipedrive to create deals
This is an excellent feature of any CRM system you choose. I would even go as far as to say a must-have. Having your email linked allows you to track all incoming and outgoing information related to a deal until it’s either closed as won or lost. This keeps your team in the know of what’s going on in the sales pipeline.
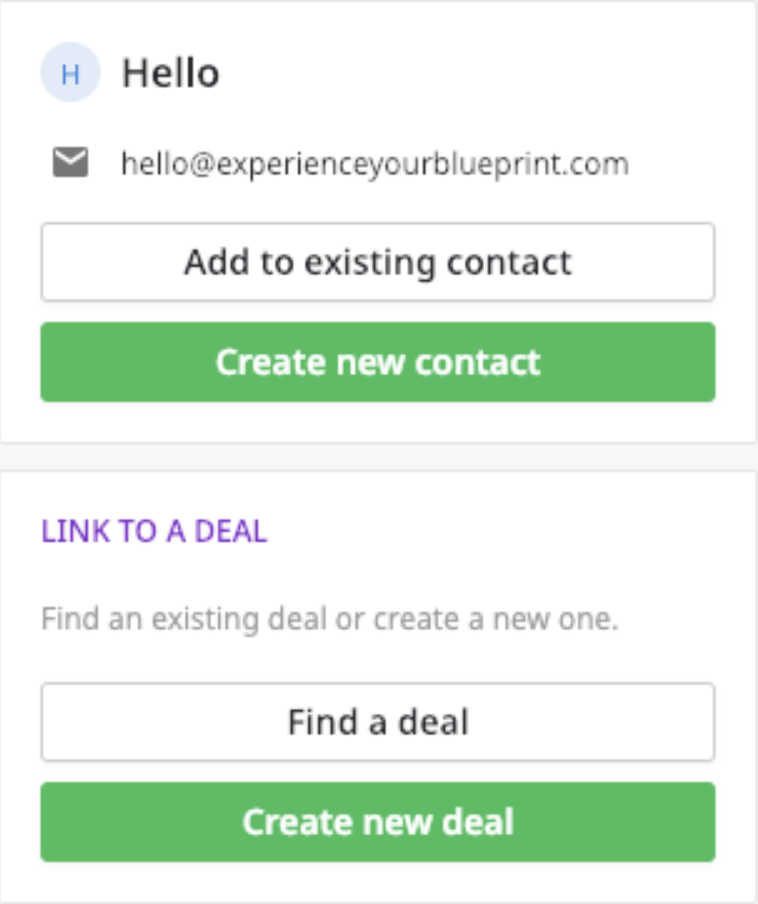
In the below screenshot, I sent myself an email so you can see what emails look like when they arrive in Pipedrive.

If you click on the email, you can see the entire message. You’re given the option to Create a New, or Add to an Existing, Contact. You can also click Create a Deal to place a deal in your pipeline from the email information.
3. Slick user interface to visualize your sales pipeline
From the minimalist colors, easily understandable icons and readable wording, to the customizable pipeline features, you can really see how Pipedrive’s user interface would be easy to pick up even if you didn’t go through their help section.

Triggers and Actions in Pipedrive
Being workflow aficionados, we really wanted a CRM that integrated with Zapier. Doing so allows us to integrate with thousands of other tools, Ignition being numero uno.
Before we jump into some of the workflows you can create, let’s review the triggers and actions within Pipedrive.
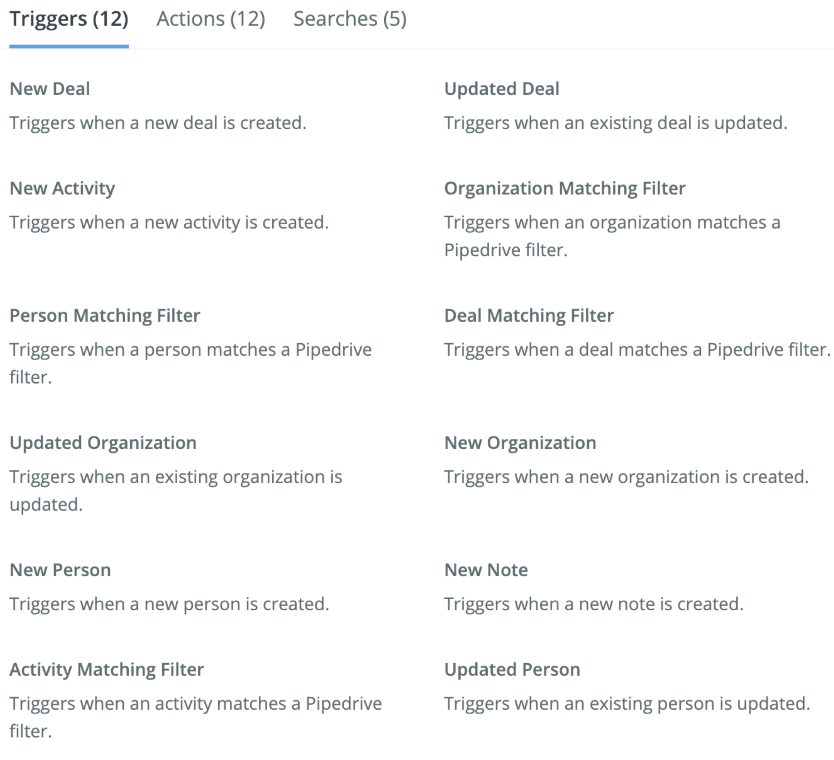
12 Triggers
Wow! 12 triggers in Pipedrive! My jaw dropped as I was taking this screenshot. That’s a lot of options to send information to other apps that you’re using.
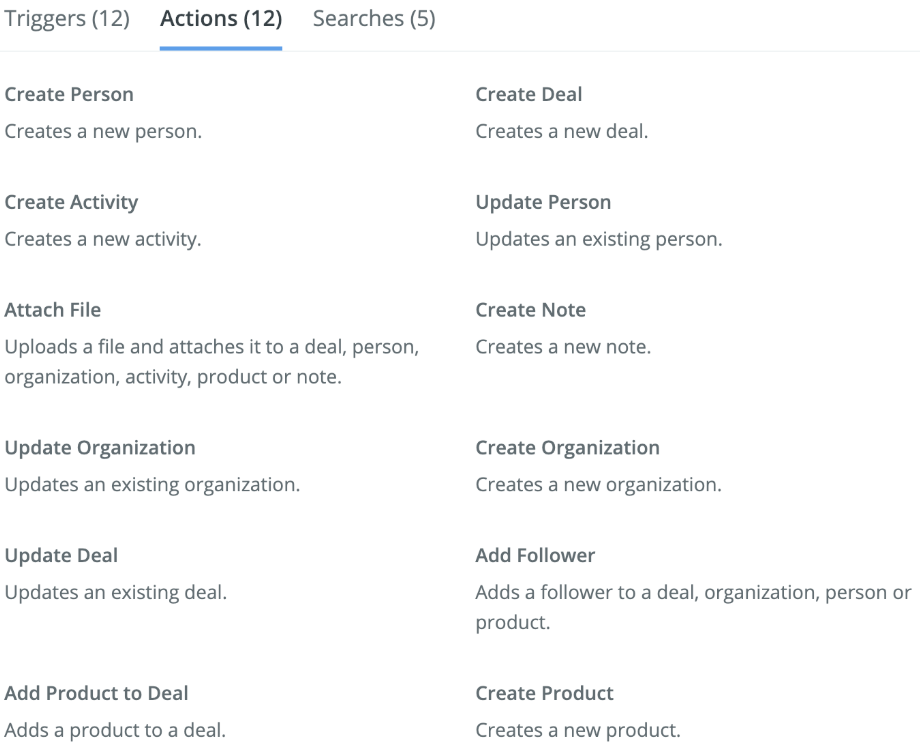
12 Actions
Okay! 12 Actions, too! If you’re not already impressed with the number of Triggers and Actions, well, you should be. This leaves a lot of options to be imagined for moving information to and from Pipedrive.
But wait, there’s more…
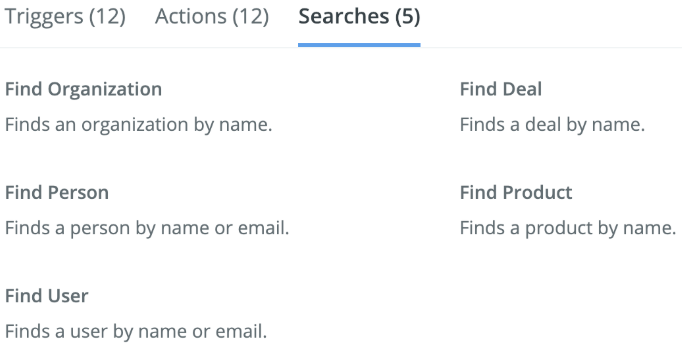
5 search options
5 search options! If you’ve never used a search step, I highly recommend using them in the future. Generally, you’re able to do a search and create in one step because for the most part there is a check box to create one of the search fields if your search doesn’t find what it’s looking for.
As you can see, there are a lot of triggers, actions, and searches you can utilize with Pipedrive. This opens up a whole world of zaps. Let’s get the imagination flowing here so you can learn some slick workflows to help you better utilize the Pipedrive/Ignition integration through Zapier.
How to get information into Pipedrive
A very important part of being able to move information from one app to the other is actually having that information in the trigger app. In this case, and as you’ll see later, our trigger app for this specific topic will be Pipedrive and/or an accepted proposal in Ignition.
But how do you get prospective client information into Pipedrive in the first place?
There are many ways to do this. Almost innumerable based on the number of apps that can be integrated through Zapier. Of course, you can manually type the information in to Pipedrive, but that’s no fun. You should use Zapier!
Typeform for prospective clients
To make this easier for you, and give you an idea, Blueprint uses Typeform to gather prospective client information. Our current process is to send out a Typeform to each prospective client before we meet with them. This allows us to gather initial contact details and information about the individual we will be meeting with. It also helps guide the conversation during our free initial assessment so we can a) not waste either parties time, and b) understand better where the value might be in the engagement.
If you’ve ever used Typeform, you know how easy it is to create a questionnaire or survey to gather information. For us at Blueprint, we have pretty standard questions that you’d expect to see: first name, last name, email, phone number, etc. Then, by using Zapier, we’re able to push this information directly into Pipedrive and create a new deal at the beginning of our sales pipeline.
The zap for something like this would look like the below graphic.
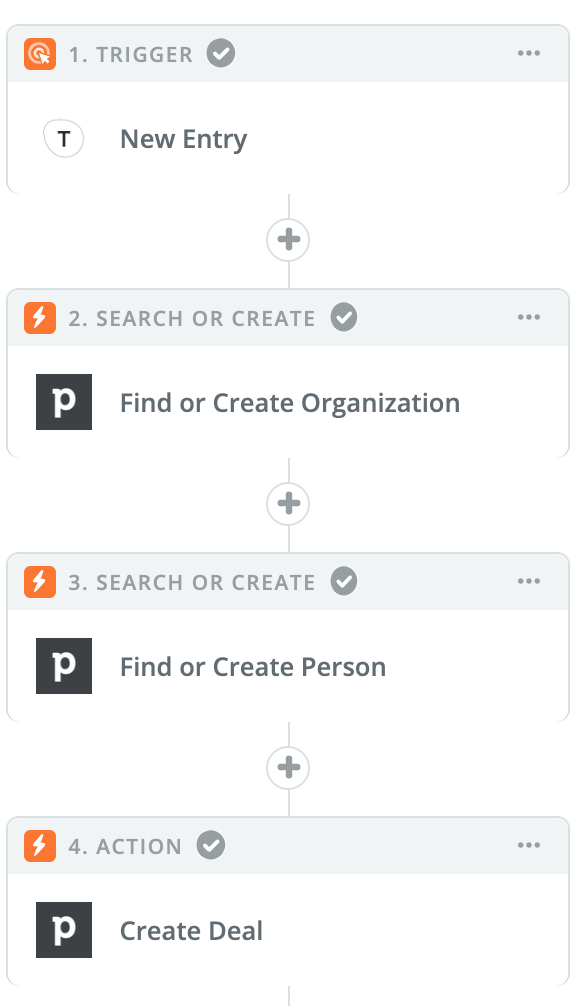
In this zap, we’re taking information that is directly entered into Typeform by a prospective lead and zapping it to Pipedrive to create three things:
- The Person
- The Organization
- The Deal
The person, organization, and deal are the three most important things you need to capture on any prospective lead. Without them, you won’t understand the lead you’re talking to and your CRM won’t be updated with proper information that you need to gather.
Check out the video below, so you can see what resides in each of these tasks in the zap screenshot above.
When should I zap contracts into Ignition?
This one is a bit of philosophical question, as it really depends on how you are using Ignition in your business.
On the one hand, you can put any and all contacts in to Ignition. If that works for you then there are a number of ways to get that information into Ignition. Looking at the previous section, “How to get information into Pipedrive”, you could easily zap this information to Ignition at the same time that you’re zapping it to Pipedrive.
On the other hand, you can wait until a client hits a specific stage in your sales pipeline to add them to Ignition. We were originally doing the first option, but found that there were contacts being created in Ignition that never converted to customers. While that’s completely okay, for our purposes, we prefer to keep only customers who have accepted a proposal in Ignition.
Setting up the zap from Pipedrive to Ignition
As in the above section “How to get information into Pipedrive”, you now have all the prospective lead information at your fingertips that you can zap in to Ignition. We use a zap that creates a client in Ignition upon hitting a specific stage in our sales pipeline. Here’s how it works:
1. Updated deal trigger from Pipedrive
We kick this zap off by including the Updated Deal trigger from Pipedrive. This Trigger is very straight forward: Pick Pipedrive > select Updated Deal as your trigger > Login to your Pipedrive account > and Test the step. Make sure you have a recently updated deal otherwise you’ll get an error that there isn’t any data to use
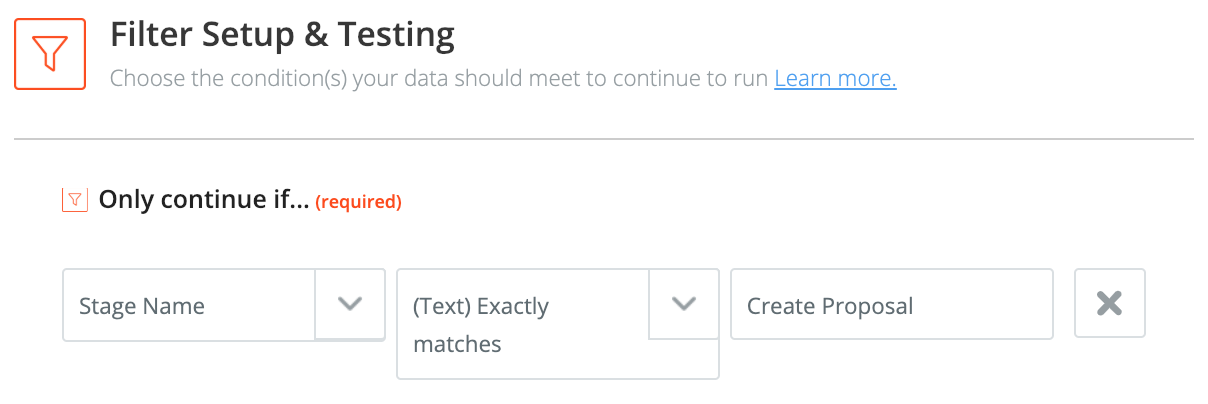
2. Filter to overlook duplicates caused by deal updates
You likely don’t want to add the client each time you update a deal. You’ll get either a lot of emails from Zapier saying the zap didn’t run, or you’ll get a lot of duplicate clients in Ignition. To mitigate this issue, we’ve added an If Filter to look for the Stage Name of Create Proposal. This is completely based on how we have our Sales Pipeline set up and could be different from your naming conventions. By moving our deal to the Create Proposal stage, we are automatically zapping important client information to Ignition to create that client for us. All we need to do is drag and drop the Deal card to the next column in our Sales Pipeline. Here’s what that looks like:
3. Zap the client into Ignition
From there, the last action in this zap is to add the client to Ignition. If you’ve ever had another zap add a client to Ignition, this is exactly the same. Depending on what information you’re adding to Ignition, you have the following options available:
a. Client Name (required)
b. Default Contact Name (required)
c. Default Contact Email (required)
d. Default Contact Salutation (optional)
e. Default Contact Addressee (optional)
f. Default Contact Phone (optional)
g. Default Contact Mobile (optional)
h. Tags (optional)
i. Notes (optional)
You should have all of this information already in Pipedrive so it’s really a matter of matching the variables to the above fields in Ignition. Here’s what this looks like in video format.
Post-sale zaps upon acceptance of proposal in Ignition
You’ve done the work to close your prospective client and now you want to kick off some workflows upon acceptance of a proposal in Ignition. Let’s jump in to some examples of what that would look like.
Updating the deal in Pipedrive upon acceptance of an Ignition proposal
The one caveat to this zap that I want to stress with you is that you will need to create very unique deal names, otherwise you may run into issues of incorrect deals being updated. We do this by using a naming convention in Pipedrive of <Business name> <Expected Services>. An example of this might be “Ignition Awesome Blog Writing by Blueprint Accounting”. See what I did there? :)
If you’re like us here at Blueprint and like to use either Paths or If Filters to kick-off various workflows based on the type of service accepted, then you’ll need to add two steps immediately after the Ignition Proposal Acceptance trigger. Doing so makes sure that your Pipedrive deal is updated before the filter or Path kicks-in. Here’s one example of how that would work:
First, you’ll want to find the deal based on the all important naming convention you decided on for your deal and proposal names. Remember, this needs to be the same across both softwares. Surprisingly, I did test this with only the customer name and it worked. But this is likely due to the fact that I only had one active deal with that customer. One active deal for a customer will probably be the case for most organizations, but beware that you could run into an issue if you have multiple open deals with the same name for one customer.

Then you will want to create one more step that uses the Update Deal action. You’ll use the “Use a Custom Value” setting to look for the deal you just found in the previous action step. Then set the status to Won. Then add in the deal Value. (Yes, I will accept $10mil to write for Ignition)
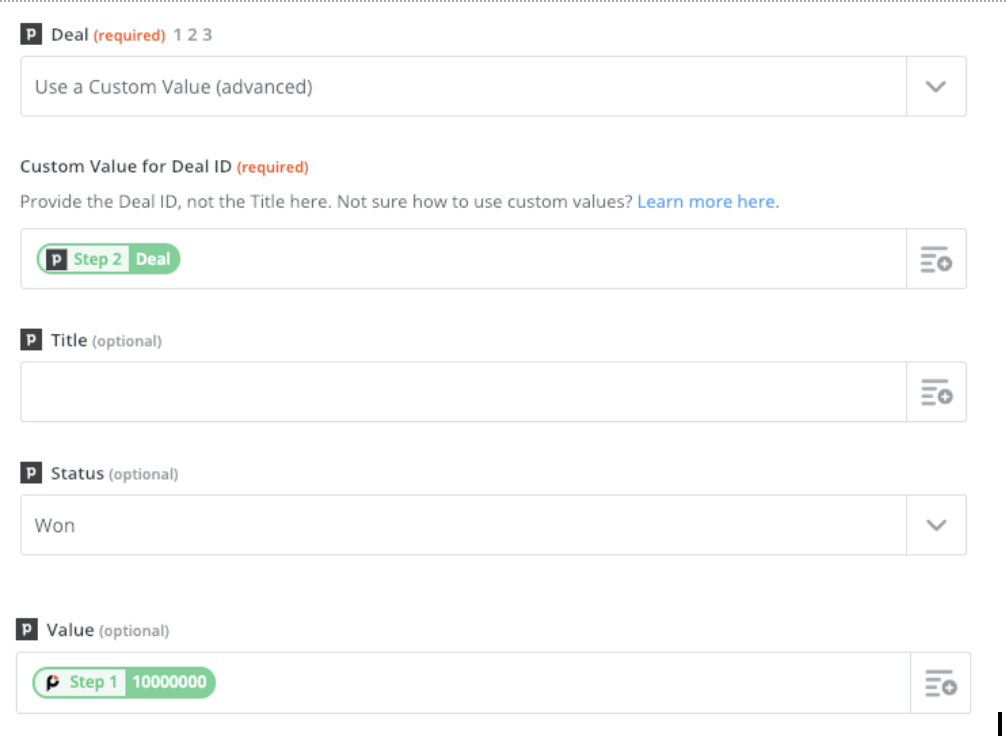
We were able to change the deal amount with a zap and also update the deal as won. One reason for doing this is so that if we want to run analytics on our Pipedrive data, we will have the proper deal amount reflected on each deal so that the analytics will be correct. Check out this video to see what this zap looks like.
I have a client accepting multiple proposals - what do I do with that?
Well, that could definitely get confusing. Luckily, Ignition updated their Zapier integration in September 2018 to include actions to pull the proposal name out of Ignition and do something with that. Best practices are to have separate names for your deals otherwise things could get really confusing in your CRM. By pulling in the proposal name, you’re able to zap that to Pipedrive and update a deal upon acceptance. This would be similar to the above zap, though adding a couple tasks to focus on the proposal name. Tom Maxwell created a video for just such a zap in this article.
How do I add an attachment to my Pipedrive deal?
Some business owners love sending a PDF copy of their Ignition proposal to Google Drive. That’s a great idea to make sure you can easily find and send a PDF version to your customers. You can also modify the first zap above to add the PDF of the proposal to each deal in Pipedrive. Similarly to the above Google Drive link, all we’re doing is adding in an additional step to attach a file to the deal that we just closed. Here’s how that works:
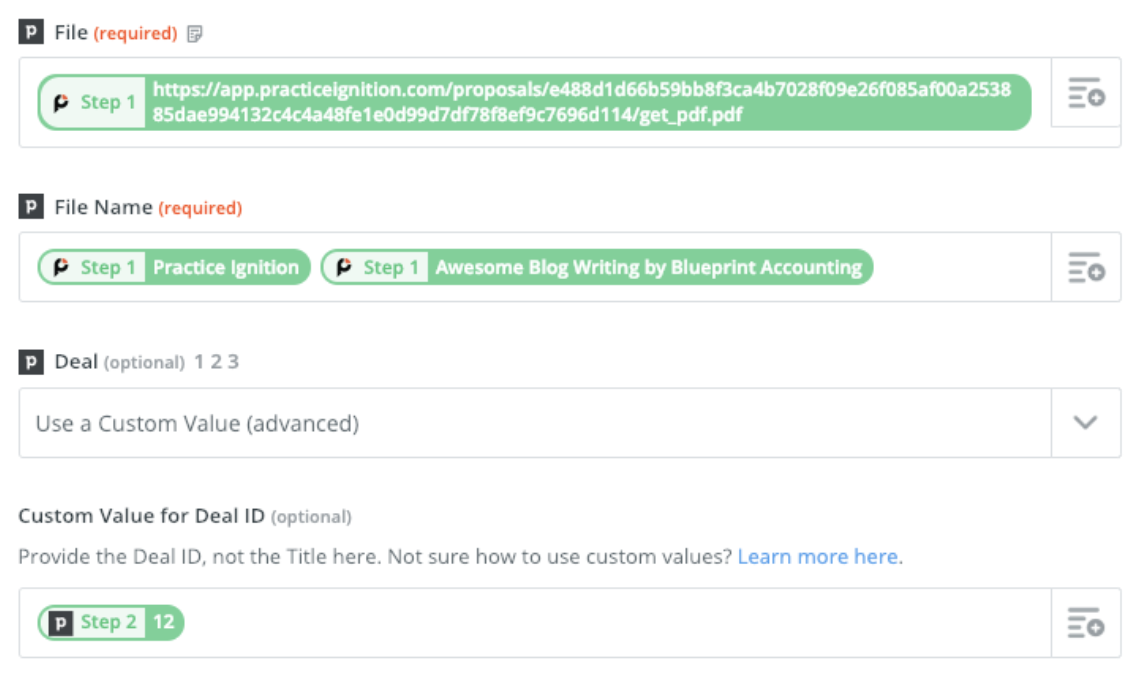
We’re going to open the zap in number one above and add an action step right after we find the deal. The action step is called Attach File.
In the required File field, we will select the Proposal PDF URL that was produced from the Trigger.
Then we pick our file name - in this case, Blueprint uses the same naming convention as mentioned above: <Business Name> <Expected Deal Name/Ignition Proposal Name>.
Finally, we change the Deal field to “Use a Custom Value” and select the deal ID from the previous Find Deal action step and put this in the “Custom Value for Deal ID” field.
Here’s what that zap looks like in video format.
In summary
Let’s recap what we’ve learned here today.
- Within Pipedrive, you have access to: 12 Triggers, 12 Actions, and 5 Searches. This allows you to create a ton of zaps.
- You can zap information from various apps into Pipedrive to create your initial person, organization, and deal.
- You can take the information from Pipedrive, send it to PI, then back to Pipedrive upon closing a deal.
- Utilizing these various triggers, actions and searches between Pipedrive and PI will save you a ton of administrative time so that you can focus on growing your business.